Why Microsoft Forms Deserves a Spot in Your Toolkit
If you’re still using Google Forms or SurveyMonkey for internal check-ins, customer feedback, or data collection — it’s time to look closer at Microsoft Forms.
It’s already part of Microsoft 365, integrates with Excel and Teams, and takes minutes (not hours) to set up. Whether you’re managing a team, gathering client insights, or streamlining admin — Forms helps you get results without friction.
This guide is built for efficient professionals who need fast, reliable, and clean-looking forms that actually do something with the responses.
What Is Microsoft Forms?
Microsoft Forms lets you create:
Surveys
Quizzes
Feedback forms
Registrations
Polls
It’s cloud-based, mobile-friendly, and integrated directly with Excel, SharePoint, Teams, and Power Automate.
Directly via Microsoft Teams (in a channel tab or post)
Tip: If you use Microsoft 365 daily, it’s already available — no setup required.
Step 2: Choose Your Form Type
When you start a new form, you’ll see two core options:
New Form – best for surveys, checklists, registrations
New Quiz – for assessments or anything with right/wrong answers
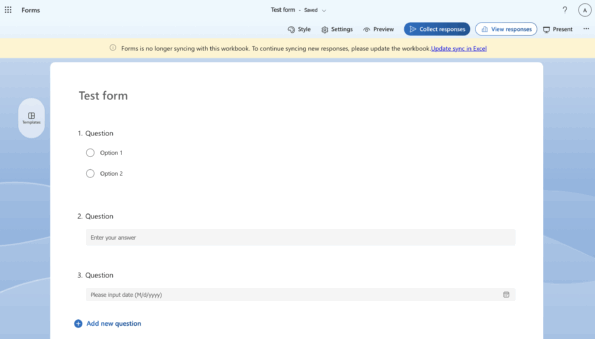
Step 3: Build Your Form (It’s Drag-and-Drop Easy)
Add questions using multiple formats:
Choice (radio buttons, checkboxes)
Text (short or long answers)
Rating (stars or numbers)
Date picker
Likert scales (agree/disagree)
File upload (only for internal users)
Net Promoter Score (built-in)
Tip: You can reorder questions using drag-and-drop and add sections to break your form into chunks.
Step 4: Brand and Configure Settings
Make your form look sharp:
Add a header image
Use preset themes or your organisation’s brand colours
Choose who can respond:
Anyone with the link
Only people in your organisation
Specific people
Need anonymous feedback? Select “Anyone can respond” for external users.
You can also:
Shuffle questions
Limit responses
Get email notifications
Close the form at a specific date/time
Step 5: Share Your Form
You can distribute your form via:
A shareable link
QR code
Email
Embed on a webpage
Directly into Teams
Forms are mobile-friendly by default, and the link never changes — ideal for automations or pinned dashboards.
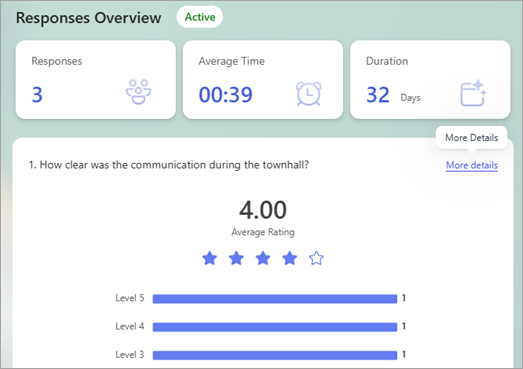
Step 6: View and Analyse Results
Get instant summaries with charts
View individual responses in detail
Export all data to Excel for deep analysis
Visualise responses in Power BI or a custom dashboard
Tip: For long-term tracking, connect Microsoft Forms + Excel + Power Automate and feed all responses into a central data hub.
Real-time summary analytics — no spreadsheet sorting required.
Common Use Cases for Professionals
Scenario
Form Type
Employee onboarding feedback
New Form with file upload & Likert
Client satisfaction survey
Net Promoter Score + Comments
Training quiz
Quiz with auto-grading
Event registration
Choice + Date picker
Project debrief
Star rating + text feedback
Tips for High-Response, Low-Friction Forms
Keep it short — 5 to 7 questions max
Use required fields sparingly
Break longer forms into sections
Always test before sending
Use simple language — clarity beats cleverness
Final Thoughts
Microsoft Forms is one of the most underused apps in Microsoft 365 — and one of the most powerful when you pair it with Excel, Teams, or Power Automate.
You can gather insights, standardise processes, and make decisions faster — all without tech headaches or third-party tools.
Want a shortcut? Check out our library of ready-to-use Microsoft Forms templates for: